Inventory Adjustments Guide
This guide describes how to create an inventory adjustment in RQ using the Inventory Adjustments API.
Before you Begin
Ensure your RQ database meets the following criteria:
- Version 6.19 or later.
- Company Tree Sync is enabled with all locations synced.
- User Manager is enabled with all users synced to User Manager.
- Product Library is enabled.
- All vendors are mapped to Entity Manager and in Vendor Setup.
- All products must either be mapped to a Product Library product with a corresponding Vendor SKU or be a private product with the corresponding Vendor SKU. For more information, see Troubleshooting.
If you are unsure if your RQ database meets these requirements, consult with your account manager or API Launch Specialist.
Steps
Step 1 - Authenticate with iQmetrix APIs
To make requests to iQmetrix APIs, you must first generate an Access Token using the access credentials from your onboarding package.
For more information on onboarding packages, authentication and how to generate an access token, see Authenticating with iQmetrix APIs.
Step 2 - Get Location Identifiers
Every inventory adjustment must specify the Entity Manager identifier for the appropriate store (StoreEntityId).
Retrieve a list of locations in your company using Get All Locations for A Company and the parameters:
CompanyId- Provided in Onboarding Package.
From the response, extract the Id of one or more stores. For this example, we will create adjustments for Dufferin Mall (14192).
Example Request
GET https://entitymanagerrc.iqmetrix.net/v1/Companies(14146)/Locations
Authorization: Bearer b0k0dY70N3Vv9jR1b9oEdW9IeT5WIn85WCYFJRo6AiIKLEMBFwNbEQsfeCUeM3gdPA1gAAVxWTJacX8mJyBaGRcFVwQOEV49NgBz
Example Response
HTTP 200 Content-Type: application/json
[
  {
    "Id": 14192,
    "Name": "Dufferin Mall",
    "DisplayName": "Dufferin Mall",
    "Description": "This Location is used to clear out discounted inventory",
    "Roles": [
      "Company"
    ],
    "CreatedUtc": "2015-02-26T00:03:01.372Z",
    "LastModifiedUtc": "2015-02-27T00:03:06.392Z",
    "Area": {},
    "Address": {
      "AddressLine1": "4970 Hillside Avenue",
      "AddressLine2": "Apt 115",
      "City": "Edmonton",
      "StateCode": "ON",
      "StateName": "Ontario",
      "CountryCode": "string",
      "CountryName": "Canada",
      "Zip": "P9H 9I4"
    },
    "Attributes": {},
    "ClientEntityId": "",
    "Contacts": [],
    "Geography": {},
    "Relationships": [],
    "SortName": "dufferin mall",
    "StoreHours": {},
    "StorePhoneNumbers":[],
    "TimeZone": {},
    "Version": 13,
    "CorrelationId": "",
    "LocationType": "",
    "LocationSubType": "",
    "Logo": {},
    "Role": "",
    "TypeId": 0,
    "Website": ""
  }
]
(Optional) Step 3 - Get Employee Identifier
You can specify the User Manager identifier for the employee that made the inventory adjustment (EmployeeEntityId). If no value is provided, the value will default to the ID of the RQ Service User (-99).
Retrieve a list of all Users using Get All Users for an Entity and the following parameters:
EntityId- Provided in Onboarding Package (CompanyId).
Note that this endpoint is paginated, and will show the first 50 results by default. To parse the rest of the results, use $skip and $top. For example, to get the next 100 results after the first 50, use $skip=50 and $top=100.
From the response, extract the Id of a User. For this example, we will use John Bates (2576) as the employee making the inventory adjustment.
Example Request
GET https://usermanagerrc.iqmetrix.net/v1/Entities(14146)/Users
Authorization: Bearer b0k0dY70N3Vv9jR1b9oEdW9IeT5WIn85WCYFJRo6AiIKLEMBFwNbEQsfeCUeM3gdPA1gAAVxWTJacX8mJyBaGRcFVwQOEV49NgBz
Example Response
HTTP 200 Content-Type: application/json
{
  "_links": {
    "prev": "string",
    "next": "string",
    "self": "/v1/Entities(14146)/Users?$skip=0&$top=50"
  },
  "_metadata": {
    "count": 1,
    "skip": 0,
    "top": 50
  },
  "items": [
    {
      "Id": 2576,
      "FirstName": "John",
      "LastName": "Bates",
      "UserName": "john@kentel.com",
      "Email": "john@kentel.com",
      "ParentEntityId": 14146,
      "ParentEntityName": "Kentel",
      "CorrelationId": "",
      "ClientUserId": "",
      "JobTitle": "",
      "Address": {},
      "Picture":{},
      "PhoneNumbers": [],
      "Profiles": [],
      "Attributes": {},
      "Version": 1,
      "IsActive": true
    }
  ]
}
Step 4 - Create an Inventory Adjustment
Create an inventory adjustment using Perform a Quantity Adjustment and the following parameters.
| Parameter Name | Notes | Example |
|---|---|---|
CompanyId |
Provided in Onboarding Package. | 14146 |
QuantityAdjustmentGuid |
You must generate a unique guid that will be used by RQ. | <GUID> |
StoreEntityId |
The store you want to adjust inventory for, from Step 2. | 14192 |
Products.Quantity |
Amount of this product to be adjusted, positive or negative. | 1 |
Products.VendorSKU |
Vendor SKU | TAACSA000061 |
Products.UnitCost |
(Optional) Unit cost. Value must be positive. If not provided, the default unit cost will be used as configured in RQ | 9.99 |
Products.ReasonCode |
Reason code, provided by iQmetrix in your onboarding package. Alternatively, you can use the Data Connect ReasonCode endpoint. | 1 |
EmployeeEntityId |
(Optional) The employee that created the inventory adjustment, from Step 3. If not provided, the ID of the RQ service order will be used (-99) by default. | 2576 |
A HTTP 204 response indicates the purchase order was created in RQ.
Example Request
POST https://apirc.iqmetrix.net/rqinventoryadjustment/Companies/14146/QuantityAdjustment
Authorization: Bearer b0k0dY70N3Vv9jR1b9oEdW9IeT5WIn85WCYFJRo6AiIKLEMBFwNbEQsfeCUeM3gdPA1gAAVxWTJacX8mJyBaGRcFVwQOEV49NgBz
Content-Type: json
{
  "QuantityAdjustmentGuid": "<GUID>",
  "StoreEntityId": 14192,
  "Products": [
    {
      "VendorSKU": "TAACSA000061",
      "Quantity": 1,
      "ReasonCode": 1,
      "UnitCost": 9.99
    }
  ]
}
Example Response
HTTP 204 Content-Type: application/json
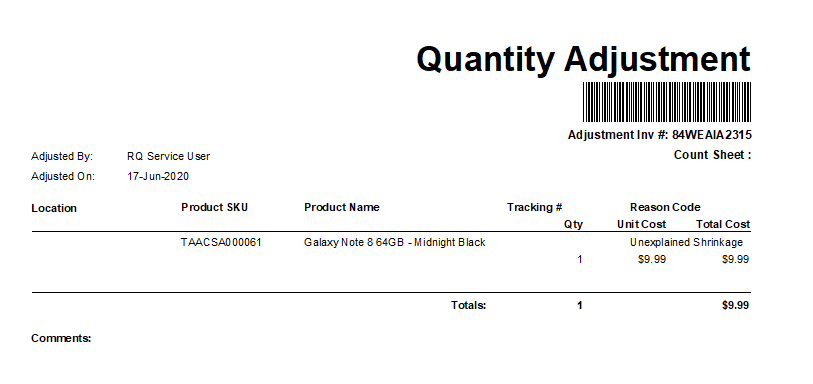
(Optional) Step 5 - View Inventory Adjustment in RQ
To view the inventory adjustment in RQ, run the Product Tracking Report for the product by Vendor SKU.
![]() .
.
 .
.
Troubleshooting
This section provides steps to resolve common problems encountered when using the Inventory Adjustments API.
No Catalog IDs exist for Vendor SKUs
This error occurs when the products or vendors are not configured properly.
The inventory adjustment API requires products in RQ to either be mapped to a product library product with a corresponding Vendor SKU or created as a private product with a corresponding Vendor SKU.
To determine if your product is mapped appropriately, follow the steps below.
- Ensure the Vendor you are using is Mapped to Entity Manager.
- Within RQ, navigate to Settings -> Vendor Setup.
- Ensure the Vendor you want to use is Enabled and Mapped (has both green and blue check marks).
- Ensure the product has the correct Vendor SKU in RQ.
- Within RQ, locate the product in the Inventory console.
- Ensure the product shows a blue checkmark in the top right corner with the text Mapped to Product Library.
- Navigate to the Purchasing tab.
- Ensure the Vendor you want to use is listed with the appropriate Vendor SKU.
- Ensure your product is synced to the Catalog API from Hub.
- Within Hub, navigate to My Catalog.
- Locate your product.
- Ensure the Vendor you want to use is listed under the Supplier SKUs section with the appropriate Vendor SKU and Supplier (Vendor).
- (Optional) Ensure your product is synced to the Catalog API using APIs.
- Search for your product using the request Get Catalog Items by Vendor SKU.
- Confirm the product is configured properly using Get Product Details for a Catalog Item.